By:
Superway - Mar 25 - 2024
Suppose you are considering installing an electric air conditioner on your electric truck, van, RV, farm machinery vehicle, or construction machinery vehicle. We want to recommend a Superway electric air conditioner to you, which not only has powerful functions but is also small in size and easy to install. It can keep your vehicle cool in the hot summer. Let’s look at how to install an electric air conditioner and what precautions should be taken.
There are 6 steps to install an electric air conditioner:
1. Installation location of electric air conditioner
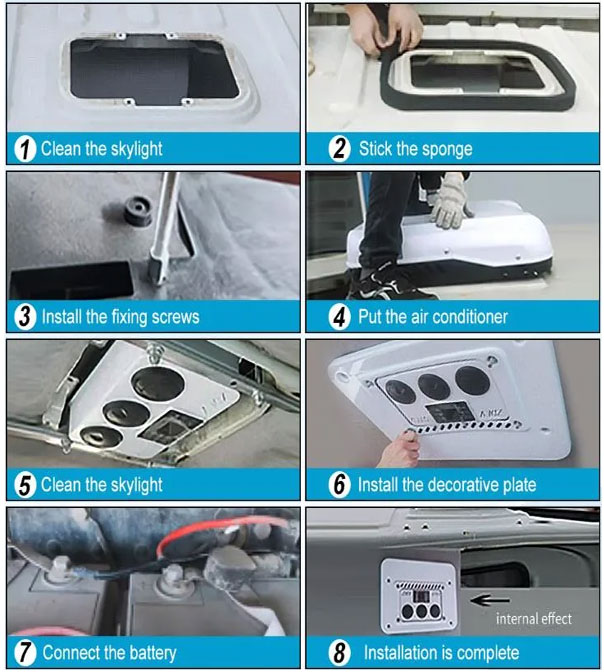
First, we need to decide where to install the electric air conditioner. This is a very, very critical step. Typically, they will be mounted on the top or sides of the bed of an electric truck. This decision will affect the performance of your air conditioning system, vehicle stability, safe driving, and vehicle appearance, so be sure to consider it carefully. (Superway recommends installing it on the top of the vehicle so that the air conditioning system can have better performance and will not affect the appearance of the vehicle. Most of our customers also install it on the roof)

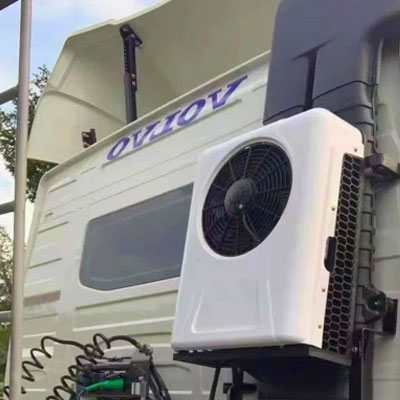
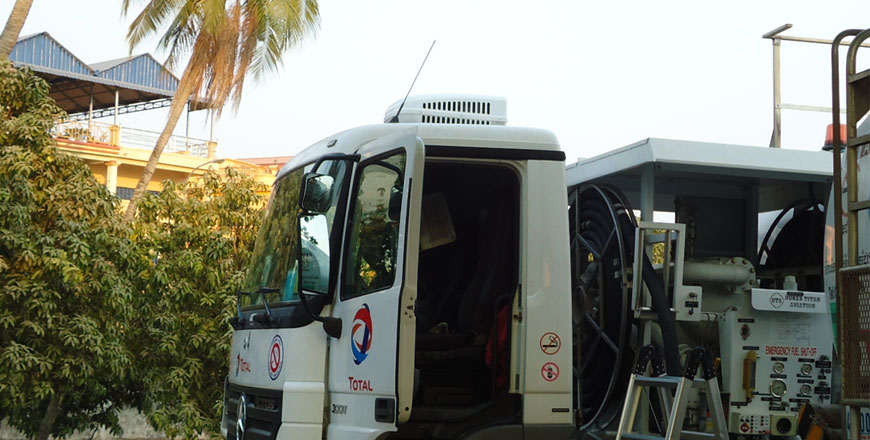
Electric Truck Air Conditioner Top Installation |
Electric Truck Air Conditioner Back Installation |
2. What preparations need to be done before installing an electric air conditioner?
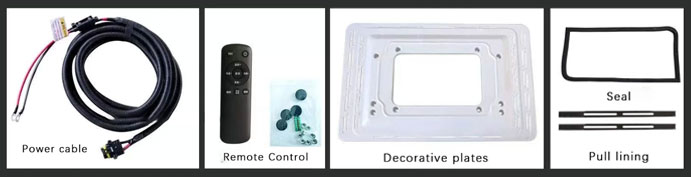
Before you begin installation, make sure you have all the necessary tools and materials. This includes screwdrivers, screws, wires, tubing, connectors, insulation and power tools. Also, for our safety, it is best to wear a hard hat and gloves.
3. Connect power
Next, connect the electric air conditioner's power cord to the
electric truck's battery. Make sure the connection is firm to avoid problems such as loose circuits causing current short circuits.
4. Install the main body of the air conditioner
1. Prepare the air conditioner bracket: The air conditioner bracket supports the main body of the air conditioner. The design and stability of the bracket are therefore critical as it will bear the weight of the air conditioner. Make sure the stand is sturdy and reliable.
2. Install the bracket: Use a screwdriver and screws to fix the bracket at the selected position and securely fasten it to the body. This ensures that the bracket is installed very firmly to prevent shaking during driving.
3. Install the main body of the electric air conditioner: There are several holes at the bottom of the main body of the electric air conditioner, and you need to use screws to fix it to the bracket. Place the electric air conditioner body on the bracket and make sure it is firmly fixed there. Make sure the main body of the electric air conditioner is in a horizontal position, which is very important for its normal operation.
In this way, the main body of the air conditioning system is installed.
5. Connect the pipes and wires of the air conditioner
Connect the air conditioning pipe:
☆ Prepare cold air pipes: You need to prepare cold air pipes of sufficient length. They are usually soft copper pipes or aluminum pipes (make sure the cuts are smooth). These pipes will carry refrigerant and send cool air from the main body of the air conditioner into the interior of the cabin.
☆ Prepare the joints: A sufficient number of connecting joints are required to connect the cold air ducts to the air conditioner body and the air outlets inside the cabin. Usually, these connectors are installed at both ends of the cold air duct to connect to other components.
☆ Connect the cold air duct to the main body of the air conditioner: Use a threaded joint or a fixing clamp to connect the cold air duct to the cold air inlet of the main body of the air conditioner. Make sure the fastening screws or clamps are very tight to avoid refrigerant leakage.
☆ Connect the cold air duct to the air outlet: Next, connect the other end of the cold air duct to the air outlet inside the cabin so that the cold air flows to the interior of the cabin. Use threaded connectors or retaining clips to ensure a secure connection.
Insulating cold air pipes: In order to prevent refrigerant leakage and reduce heat loss from cold air, cold air pipes need to be wrapped with insulating materials such as foam pipe sleeves or insulating tape.
Connect the wires:
☆ Prepare wires: Prepare wires of sufficient length to connect the main body of the electric air conditioner to the power system. Typically, one end of the wire will be connected to the power input port on the electric air conditioner body, and the other end will be connected to the electric truck's power system.
☆ Connect the wires to the air conditioner body and power system: Plug one end of the wire into the power input port on the electric air conditioner body. The other end is connected to the electric truck's power system.
☆
Test the wire connections: After you've finished connecting the wires, make sure everything is connected correctly and there are no loose plugs.
6. Test and inspect the installed air conditioning system
1. Power supply test:
Turn on the power: First turn on the power of the electric truck which is already on. Then, turn on the power switch of the electric air conditioner.
Check the indicator light: Observe the indicator light on the main body of the electric air conditioner. Make sure the indicator light indicates the air conditioning system is operating properly.
2. Control panel test:
Using the remote control or control panel: Use the remote control or control panel of your electric air conditioner to set the temperature and fan speed. Make sure the various setup options are working properly.
Adjust the temperature: Set the temperature of the electric air conditioner and observe the indoor temperature. Make sure that the temperature setting can be properly reflected in the cooling effect of the air conditioner.
Adjust the wind speed: Adjust the wind speed setting and observe the changes in the wind speed. Make sure the fan speed setting controls the intensity of the cold wind.
3. Air flow test:
Feel the cold air flow: Stay inside the electric truck and feel whether the cold air flow is evenly distributed throughout the cabin. Make sure the air conditioner can meet your expectations.
Check the wind direction: Use your hands or paper towels to check the airflow direction of the air outlet to see if it can flow where you want.
, you can enjoy a cool and comfortable driving experience. If you encounter any problems during installation, testing, or maintenance, don’t hesitate to contact
Superway’s professional team. Superway is known for high-quality products and excellent consulting services, and we will do everything we can to ensure that your electric air conditioner runs well in any environment. So, let’s stay cool in the hot summer days and always enjoy the convenience and comfort of Superway electric air conditioners. On the way forward, please remember that coolness starts from Superway!

Leave a Reply
Your email address will not be published. Required fields are marked *